

Beginners are told to use video reference and then left to work out what reading it means. At full speed a jump is a blur with a landing on the end of it, and the three frames where the weight arrives are gone in an eighth of a second.
Slow the clip, find the poses that carry the action, count the frames between them, then compare those frames against each other. All of it happens on the board, next to the rest of the reference for the shot.
Timing and spacing are two different questions
New animators tend to run these together, and the result is movement that is technically correct and completely dead.
Timing is how many frames an action takes. A head turn in six frames is a flinch. The same turn in eighteen is a decision.
Spacing is where the positions fall inside those frames. Two head turns can both run twelve frames and read nothing alike. Space them evenly and the head moves like a machine part. Bunch them at either end and the same twelve frames become a head easing out of one look and settling into another.
Even spacing
Bunched at both ends
Reference answers both questions, but not at the same time. Timing comes from counting, spacing from comparing.
The frames worth counting between are the ones holding the action: the extreme an arm reaches before it reverses, the contact where a foot takes the weight, the breakdown that decides how the body travels between the two.
Slow the clip until you can see the poses
Pick something you can actually read: one continuous shot, a camera holding still, the whole body in frame. A cut in the middle of the action, or a camera that pans along with it, costs more time than the clip saves.
If nothing you saved fits, act the action out and film it, then bring the clip in from Photos. You are holding the camera that way, so the framing comes out the way you need it.
Put the video or GIF on the board and use the controls on the item itself. Video cycles through 0.5×, 1×, 1.5×, and 2×; GIFs go down to 0.25×. Scrub to the right area, then move one frame at a time. The counter next to the transport reads the current frame against the total.
Let a video play through once before you start stepping. A video sitting paused shows a coarser preview than it does in playback, and a pose you are trying to read off a soft frame is a pose you will read wrong.
For a GIF, open the filmstrip under the item and read the sequence as thumbnails. Extremes usually survive at that size, because the silhouette at the top of a jump does not look like the frames on either side of it. Jump to the one you want instead of scrubbing past it. Video keeps frame stepping and onion skinning, but it has no filmstrip.
Count the frames to get the timing
Step to the first pose that holds the action and note the frame number. Step to the next one and subtract. Write the counts on the board while you have them, because a note card reading “crouch to launch: 3, launch to peak: 7, peak to contact: 6” is more use next week than the clip is.
The counter reports frames, not seconds, and a count only carries over if the clip and your scene run at the same rate. Phone footage is usually 30 or 60 fps and most animation is worked at 24, so convert through seconds: fifteen frames at 30 fps is half a second, which is twelve frames at 24. Twelve frames at 24 is a landmark worth keeping, roughly one step of an ordinary walk and half of Williams’s twenty-four-frame cycle.
Then treat the numbers as a starting point, not a target. Animation that matches live action frame for frame reads slack, which Disney found on Snow White: the human characters were traced from footage and still came out as caricatures of the models, not copies of them.
Turn on onion skinning to see the spacing
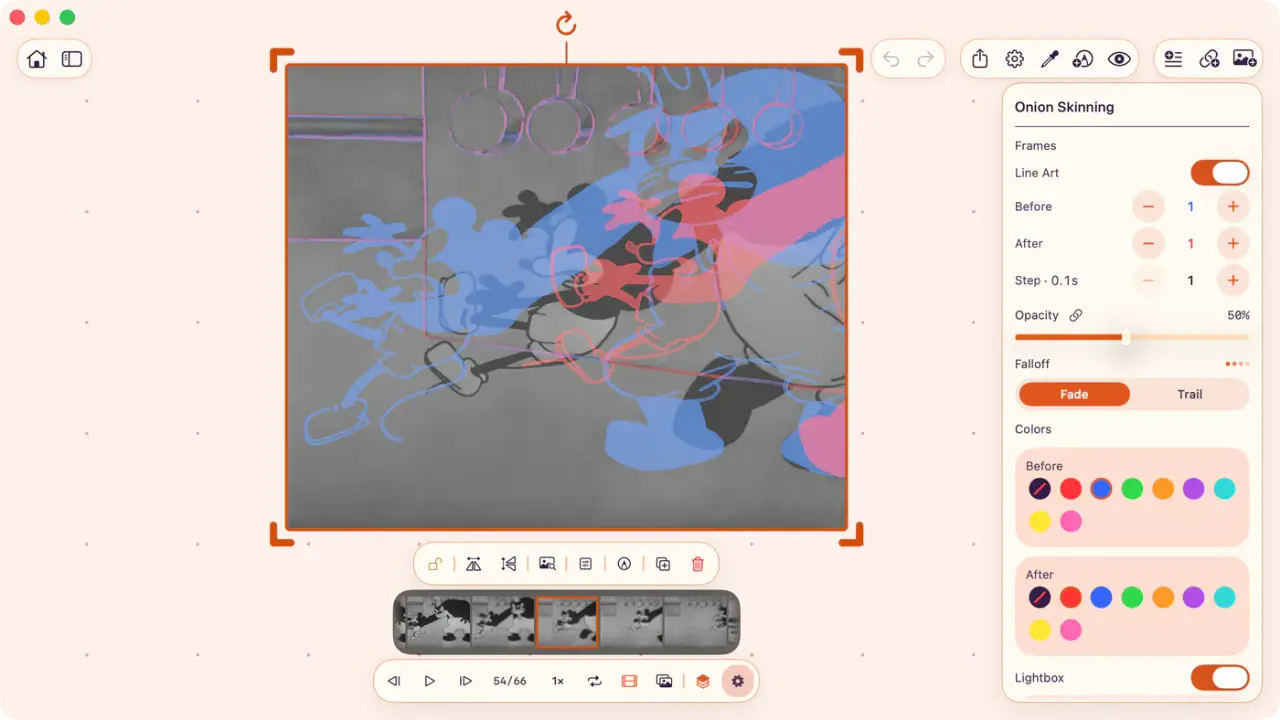
Onion skinning draws the frames around the current one on top of it, which answers the spacing question directly: the gap between one landmark across those frames is the spacing.
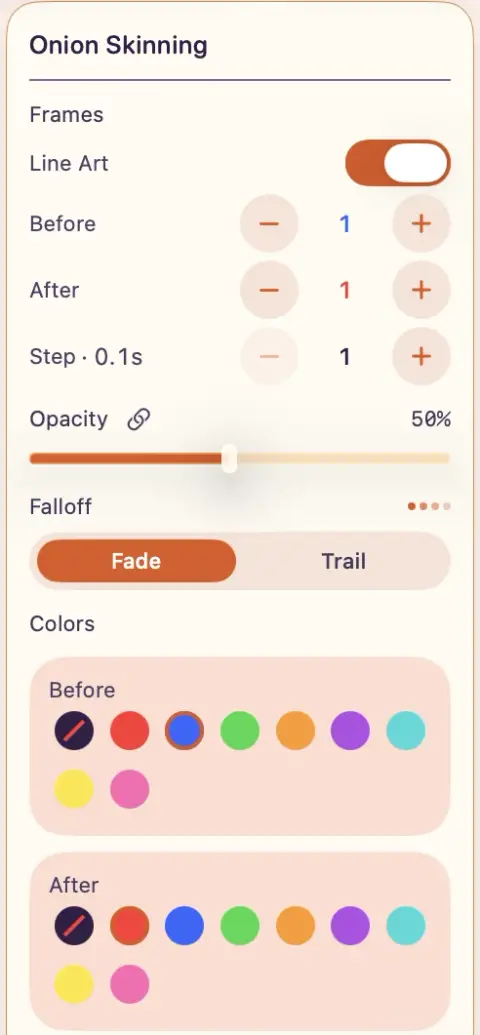
The settings, in panel order:
- Line Art traces the neighbors as contours instead of solid shapes, which helps when the figure is dark or the background is busy.
- Before and After set how many frames get drawn on each side. One or two a side keeps a contact legible where a larger number turns a whole arc into a single image.
- Step sets how far apart those frames are sampled, in tenths of a second, so a fast action can be compared frame by frame and a slower one at wider intervals.
- Opacity and Falloff, either Fade or Trail, govern how the outer frames drop off. That is the difference between reading one neighbor clearly and reading the shape of the whole path.
- Colors are set per side, so the frames behind never get confused with the frames ahead.
Then pick one landmark and follow it: the heel, the top of the head, the tip of a hand. Even gaps mean constant speed. Gaps tightening toward one frame mean the action is slowing into it, gaps opening up mean it is accelerating out, and those two readings are slow in and slow out.
Sketch those gaps as a ladder next to a key and you have a timing chart, the note traditional animators write on a drawing to tell the inbetweener where the frames fall. Some software calls the same ladder a spacing chart, which is the more honest name for what it holds.
Drop the colors when the footage is real
Assigning red to the frames behind and blue to the frames ahead works on drawn animation, like the GIF at the top of this page, where the image is flat and the silhouette is most of what there is to read. On live-action footage the color fights the picture. Set both sides to no color and the neighbors stay photographic, ghosted at whatever opacity you chose.
Three frames either side, sampled at 0.3-second intervals and held at 70 percent, turns a seven-second clip of someone running into a single image of the same stride repeated across the pavement. You are no longer estimating the spacing between foot plants. It is laid out end to end, at a known interval, in the same frame.
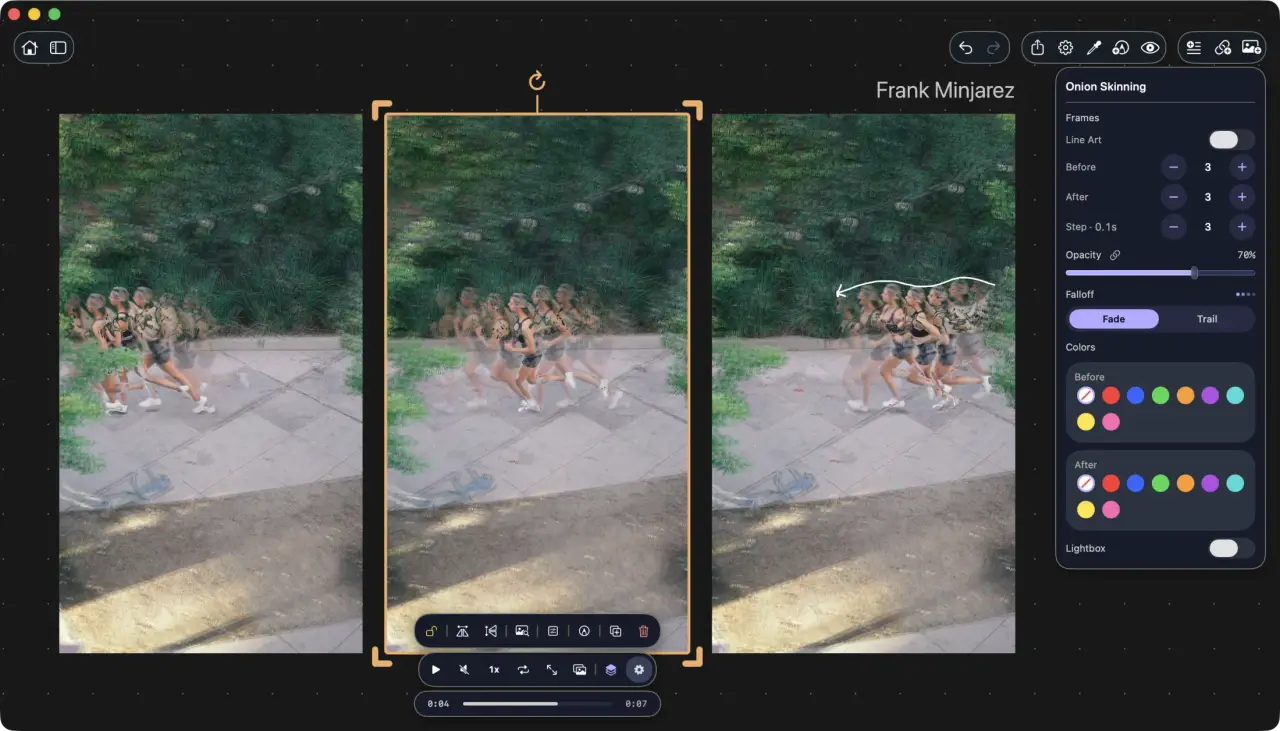
Save the overlay back to the board as a still and draw on it: the arc the head travels, where each foot plants, the count you got between them. Arcs are close to invisible in playback and obvious the moment they are a drawn line. The clip goes back to being a clip, and the thing you worked out stays on the board as its own item, next to the source and its credit.
Study a paused frame like a still
Stop on a pose and open one of ArtDeck’s study lenses. The same five lenses that read a still image work on a paused frame, and a key pose has its own questions.
Reducing the frame to a two-value Notan with Values tells you whether the pose reads as a silhouette. If an arm vanishes into the torso in black and white, it was never clear in the reference, and copying it will not fix that. Read groups the frame into its large shapes, which is the squint test without the squinting.
Measure drops a plumb line through the supporting foot and the head so you can see where the weight is actually sitting, and it reads the angle between the shoulder line and the hip line, which is the twist you would otherwise be guessing at. Composition puts grids and a viewfinder over the frame when the question is staging, not the body.
None of this touches the source clip. Save the result on the same board as the frame it came from, or export it. For how these tools compare with the desktop reference apps, see the reference board app comparison.
Keep the clip with the rest of the shot
Reference for a shot is never one video. There is the clip, the character you have to stay on model to, a note about what was asked for, the link back to where the clip came from, and the two or three frames you pulled out of it. On one board they stay in relation to each other.
On iPad you might be animating in Procreate Dreams, RoughAnimator, Callipeg, or something else. ArtDeck runs in Split View, Slide Over, and Stage Manager, so wherever the drawing app supports the same, both apps stay in view and checking the count on frame 54 costs a glance instead of an app switch. Boards work offline, and a board set to sync through iCloud is already open when you get to the Mac.
What ArtDeck will not do for you
It does not key, in-between, or composite, and it has no timeline to put drawings on. Annotation is a different matter: pull a frame or an onion-skin overlay out to the board and you can draw over that copy freely, which is where the arcs and counts above end up. The source clip stays as it was.
What you take away is a set of numbers and comparisons for the app where the animation actually gets made.
The motion study page lists the playback controls, and the study tools page covers the five lenses.
Common questions
How do I step through a video frame by frame on an iPad?
Put the clip on an ArtDeck board and use the controls on the item itself. Video steps through 0.5×, 1×, 1.5×, and 2×, GIFs go down to 0.25×, and the counter next to the transport reads the current frame against the total so you always know where you are. Let a video play through once before stepping, since a paused video shows a coarser preview than it does in playback.
What is onion skinning for, if I am not animating?
It answers the spacing question on someone else’s footage. Drawing the frames around the current one on top of it turns the gap between a landmark across those frames into something you can see: even gaps mean constant speed, gaps tightening toward one frame mean a slow-in. You are reading the timing out of the reference, not making a drawing.
Do the frame counts transfer to my own animation?
Only if the clip and your scene run at the same frame rate. Phone footage is usually 30 frames per second, which does not line up with a 24fps scene without conversion. Treat the counts as a starting point either way, since animation that matches live action frame for frame reads slack.
Can I animate in ArtDeck?
No. There is no timeline, and it does not key, in-between, or composite. It reads reference and hands you numbers and comparisons for the app where the animation actually gets made. You can draw over a frame or an onion-skin overlay pulled out to the board, which is where arcs and timing charts end up.
Sources:
- Richard Williams, The Animator’s Survival Kit, Faber and Faber
- Frank Thomas and Ollie Johnston, The Illusion of Life: Disney Animation, Disney Editions
- Snow White Museum on the live-action models